AI-Powered Kubernetes Monitoring with Robusta and Holmes GPT on Azure AKS
Using Robusta to setup your own automated AKS alerting paired with AI Assistance using Holmes GPT
I recently completed a Hackathon with my company on a project, the goal of the Hackathon was to take repeating issues found on the project and come up with an AI focused solution to fix it.
The task we got assigned was to create an AI focused solution for errors related to:
- AKS issues
- Flux (Missing secrets, broken images in lower environments etc)
- BAU teams facing difficult AKS related errors with not a lot of prior knowledge
- Teams lacking AKS skills to help troubleshoot issues
Originally we thought of implementing a solution using the Flux MCP server, but after many debates and thoughts we opted for an alternative solution. Which was looking into Robusta (A Kubernetes monitoring system) and Holmes GPT (An Open-Source AI Agent) which you can find out more about here - Robusta Docs
So on the day through lots of Claude tokens burnt, endless amounts of coffee and a few scrambled heads... we got a solution built (kind of) We had parts of it working where we could demo this. However I wanted to see this out and build the solution fully to share with you all. So lets jump right into it.
Here is a link to the GitHub Repository - GitHub Repository
Prerequisites
- AKS Cluster: Running and accessible via
kubectl - Helm: Version 3.x installed
- Slack Workspace: Admin access to create apps
- kubectl: Configured to access your AKS cluster
- Slack Account: Have a dedicated Slack account/profile
Before we begin, we can also set this up inside ADO for our pipeline if you wish to integrate it. If not you can continue on and do this manually applying via the CLI
- Go to Azure DevOps → Your Project → Project Settings → Service connections
- Click New service connection → Azure Resource Manager
- Select Workload Identity federation (automatic)
- Select your subscription and resource group
- Name it (eg.,
ROBUSTA-SERVICE-CONNECTION) - Tick the box - Grant access permission - for all pipelines
- Click Save
The pipeline needs to create and manage Azure AD groups for KeyVault access. To enable this, we need to grant API permissions to the App Registration.
Prerequisites: You need Global Administrator or Privileged Role Administrator role in Azure AD.
Grant Permissions via Azure Portal:
-
Go to Azure Portal → Entra ID → App registrations
-
Find your app (search for your service connection name or check the Manage App registration link in the service connection)
-
Click API permissions → Add a permission
-
Select Microsoft Graph → Application permissions (NOT Delegated)
-
Search for and add these two permissions:
Group.ReadWrite.All- Allows creating and managing Azure AD groupsGroupMember.ReadWrite.All- Allows managing group membershipUser.Read.All- Read all users' full profiles for adding them to the AD Group
-
Click Add permissions
-
CRITICAL: Click Grant admin consent for {YourTenant}
-
Confirm when prompted
### Security Note

These permissions allow the pipeline to manage Azure AD groups, but only within the context of what is defined in your Terraform code. The service principal also needs appropriate RBAC roles at the subscription/resource group level (like Contributor) to create Azure resources.

This solution uses Workload Identity Federation - the most secure authentication method that eliminates the need for managing secrets or rotating credentials.

When you create the service connection with Workload Identity federation (automatic), Azure DevOps and Azure establish a trust relationship using OpenID Connect (OIDC). The pipeline authenticates using short-lived tokens instead of long-lived secrets.

The service principal still needs appropriate RBAC roles at the subscription/resource group level (like Contributor) to create Azure resources, and Microsoft Graph API permissions to manage Azure AD groups as defined in your Terraform code.

Benefits of this approach:
- No client secrets to manage or rotate
- Tokens are short-lived and automatically managed
- More secure than traditional service principal authentication
- Follows Microsofts recommended best practices
Step 1: Setting up your dedicated Slack Application
The first step we are going to talk about here can be done before any coding, make sure you have a Slack account before we do this. Lets get into it!
The purpose of setting up this slack application is so we can authenticate from Slack > AKS Cluster and this is how you can set it up below:
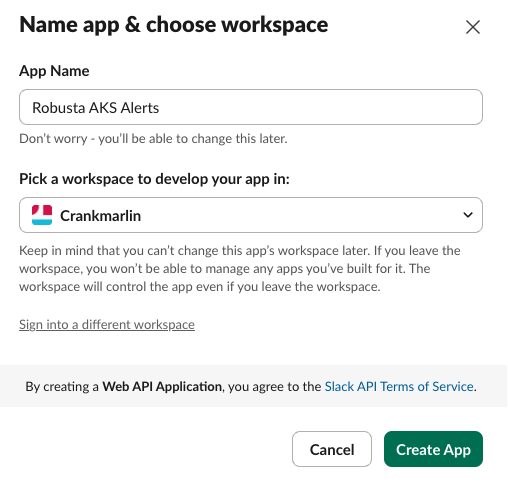
- Go to Slack Apps
- Click
Create New App→From scratch - Name:
Robusta AKS Alerts - Select your workspace
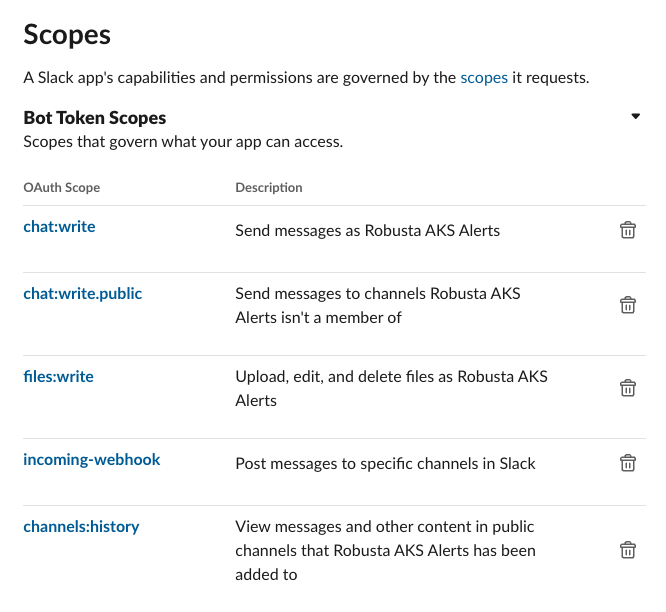
Step 2: Configure Bot Token Scopes:
Now that we have configured our application lets provide it some permission scopes, these scopes will specify what we actually want to allow the Application to be allowed to do.
Navigate to OAuth & Permissions → Scopes → Bot Token Scopes and add the following permissions:
chat: writechat: write.publicfiles: writeincoming-webhookchannels: history
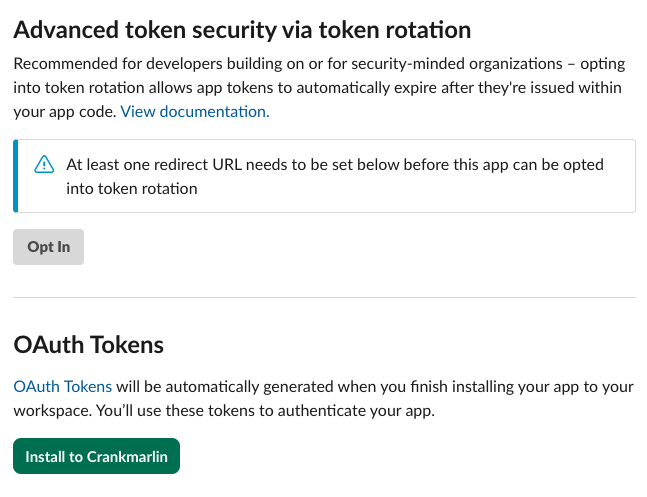
Step 3: Install App to Workspace:
Now that we have configured the Slack Application and given it the correct permission scopes we want to go ahead and now download this to our own Workspace. So to do this please do the following below
- Click
Install to Workspace - Authorise the app
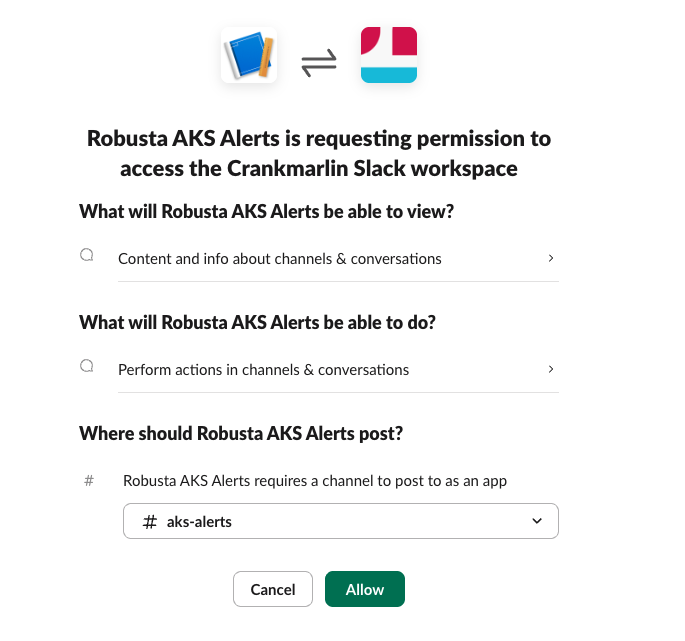
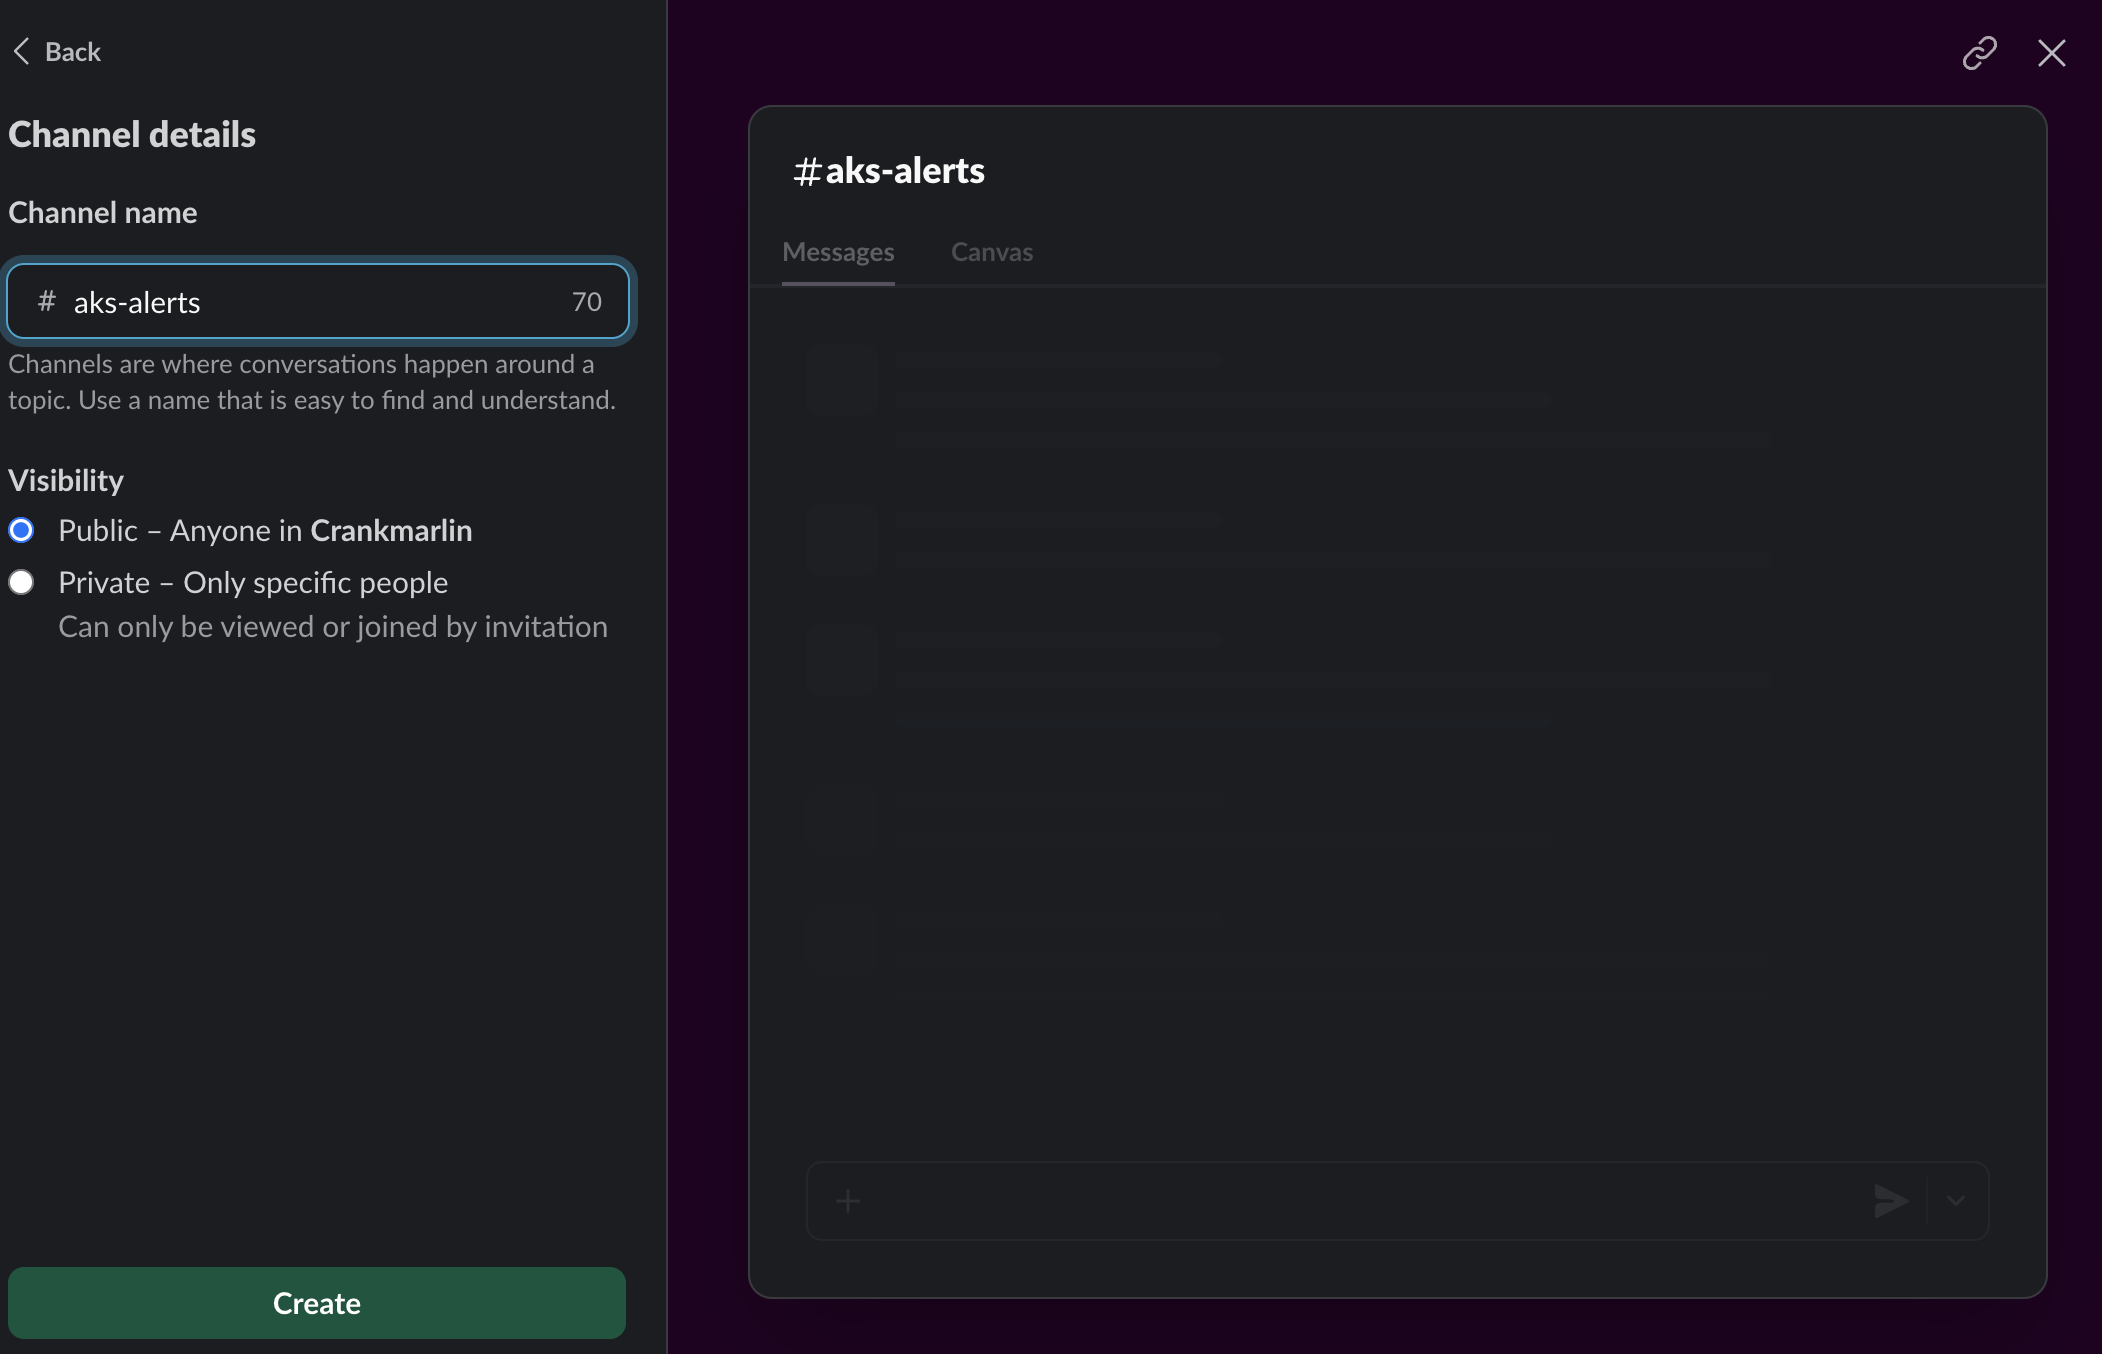
Once we have installed this to the workspace we are going to be asked to select a channel to configure.
- Create a Slack channel for alerts (e.g.,
#aks-alerts) - Once we have created the channel we can then select the channel we want
- Once we have the slack channel selected we can allow this channel to perform actions such as posting messages etc, it will look something like this below once you click
install to <your-workspace-name> - Copy the
Bot User OAuth Token(starts withxoxb-and can be found at the homepage we get redirected to )
Step 5: Create the Robusta namespace inside the AKS Cluster
Now we will create the Robusta and Flux namespace inside the AKS cluster and start to configure our AKS Cluster.
Before doing this stage you should have deployed all of the Infrastructure from my repository here - GitHub Repository
You can run this manually or if need be setup the Pipeline details.
We can run these commands below.
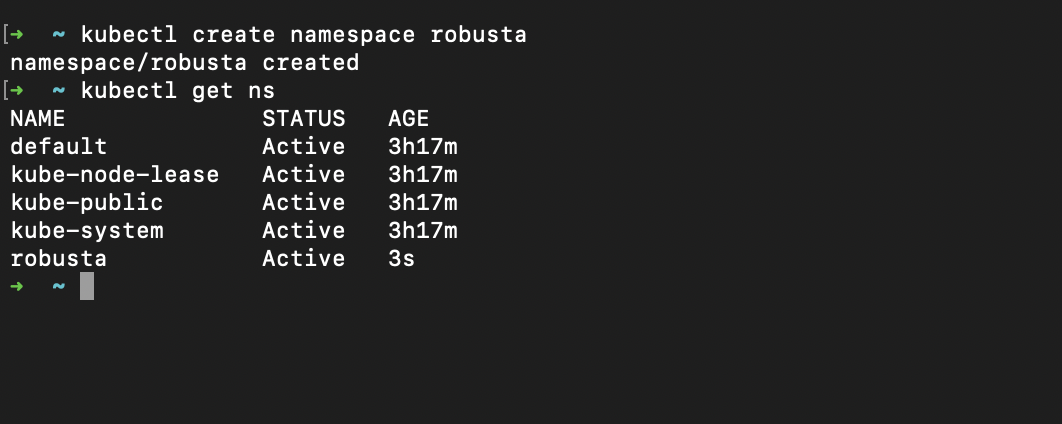
kubectl create namespace robusta
kubectl create namespace flux-system
The first thing we will do here is create the Robusta and Flux namespace like so below:
Step 6: Create the AzureAD Group and add ourselves as a member to add the KeyVault secret for the OAUTH token.
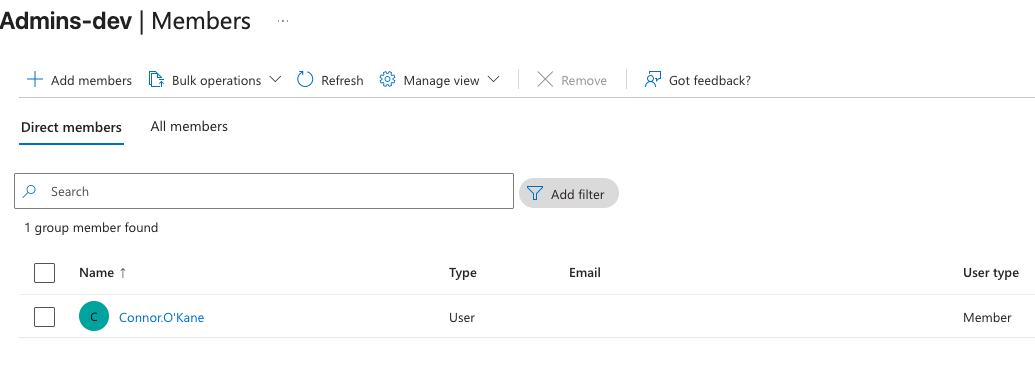
In the Terraform code we have a module that's used in order to create an AzureAD Group, this group is used to select members from your organisation who you wan to give control to access and read/write/create secrets inside the KeyVault
This is vital as we want to store the OAUTH Token inside the KeyVault and then that secret will be inherited into AKS.
So once you have spun all of the Terraform code up you can then go and add yourself as a member to the KeyVault-Robusta-Admins-devgroup like below.
Once we have done this we can then go and visit the KeyVault we have created and store the OAUTH Token inside here and move onto our next step. You can call the secret inside KeyVault something like slack-bot-token with the following AzCLI command below:
# Add the Robusta Slack bot token

az keyvault secret set \
--vault-name kv-robusta-dev \
--name slack-bot-token \
--value xoxb-YOUR-SLACK-BOT-TOKEN
Step 7: Enable the CSI Secret Store Driver on AKS
Now the next thing we have to do is ensure we enable something in AKS called CSI Secret Store Driver you can find this documentation from Azure if you'd like to read more about it but for now lets continue - CSI Driver Docs
NOTE This may already be configured be default but if not you can use the above step!
# Command for enabling the CSI Driver

  az aks enable-addons \
    --addons azure-keyvault-secrets-provider \
    --resource-group rg-robusta-dev \
    --name aks-mcp-gateway-dev
Step 8: Creating a GitHub App for Flux
The first step we will do here is follow the official Flux documentation here which you can find - Flux Docs
We will first of all install the Flux Operator using the Helm chart.
helm install flux-operator oci://ghcr.io/controlplaneio-fluxcd/charts/flux-operator \
  --namespace flux-system \
  --create-namespace
Then next you can follow the steps below to create the GitHub App needed.
To create a GitHub App for Flux, follow these steps:
1. Create the App
Go to: https://github.com/settings/apps/new
2. Fill in the App Details
- **GitHub App name:** Flux CD - AKS Robusta (or any name you prefer)
- **Homepage URL:** https://fluxcd.io
- **Webhook:** Uncheck Active (we dont need webhooks)
3. Set Repository Permissions
- **Contents:** Read and write (to commit Flux manifests)
- **Metadata:** Read-only (automatically required)
- **Pull requests:** Read-only (optional, for GitOps workflows)
4. Installation Scope
**Where can this GitHub App be installed?**
Select - Only on this account
5. Create the App
Click - Create GitHub App
6. Generate Private Key
After creation:
- Scroll down to - Private keys
- Click - Generate a private key
- Download the `.pem` file (save it securely!)
7. Note Important Information
Make note of the following:
- **App ID:** Shown at the top of the page
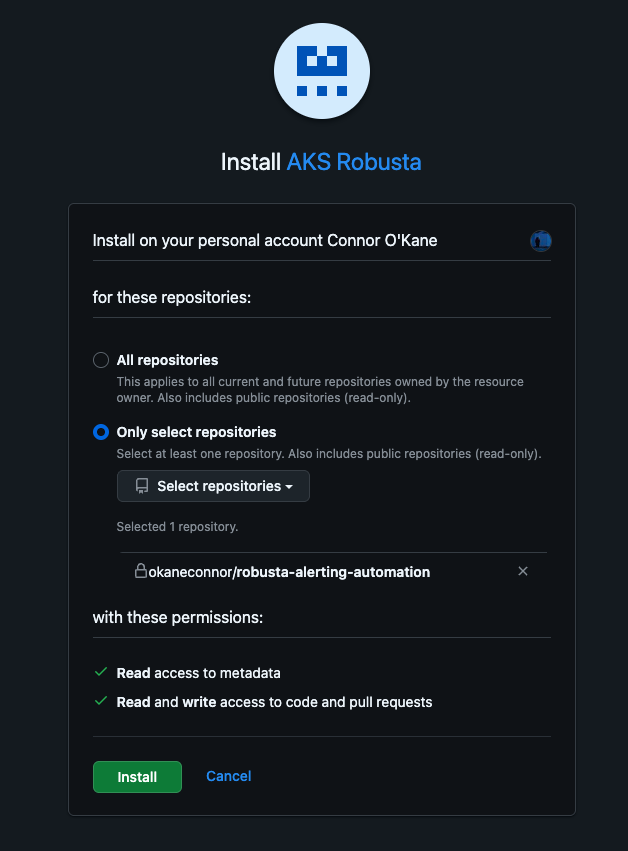
- **Installation ID:**
- Go to - Install App > Install to your account
- The installation ID is in the URL: `/settings/installations/XXXXXXXX`
NOTE If your ever in a situation where you have destroyed all of your infra and you need to rerun it again YOU MUST UPDATE THE FEDERATED IDENTITY VALUES FOR THE CLIENT ID BELOW LIKE SO
## Step 1: Get Workload Identity Client ID

cd terraform
CLIENT_ID=$(terraform output -raw workload_identity_client_id)
echo Client ID: $CLIENT_ID

**CRITICAL:** Save this Client ID - you will need it in the next step!

  1. flux/apps/robusta/serviceaccount.yaml
  2. flux/apps/robusta/secretproviderclass.yaml
  3. flux/apps/holmesgpt/serviceaccount.yaml
  4. flux/apps/holmesgpt/secretproviderclass.yaml
  5. flux/apps/slack-holmes-bot/serviceaccount.yaml
  6. flux/apps/slack-holmes-bot/secretproviderclass.yaml


## Step 6: Commit and Push Client ID Updates

git add .
git commit -m Update workload identity client IDs for new deployment
git push
Step 9: Create GitHub App Secret in Kubernetes
Now we have setup the GitHub Application we will now create GitHub App Secret in Kubernetes according to the Flux Docs.
Below is the steps to do this.
1. **Create GitHub App Secret in Kubernetes**

Once you have your GitHub App created and installed to your repository, create the Kubernetes secret for Flux to use:

  flux create secret githubapp flux-system \
    --namespace=flux-system \
    --app-id=YOUR_APP_ID \
    --app-installation-id=YOUR_INSTALLATION_ID \
    --app-private-key=/path/to/your-app-name.YYYY-MM-DD.private-key.pem

  Example:
  flux create secret githubapp flux-system \
    --namespace=flux-system \
    --app-id=2123457 \
    --app-installation-id=90212269 \
    --app-private-key=/Users/yourname/Downloads/aks-robusta.2025-10-15.private-
    key.pem
2. Install Flux Components to Cluster

command - flux install

This installs:
- source-controller - Handles Git repository syncing
- kustomize-controller - Applies Kustomizations
- helm-controller - Manages Helm releases
- notification-controller - Sends notifications

Verify installation:
kubectl get pods -n flux-system

Expected output:
NAME                                       READY   STATUS    RESTARTS   AGE
source-controller-xxxxx                    1/1     Running   0          1m
kustomize-controller-xxxxx                 1/1     Running   0          1m
helm-controller-xxxxx                      1/1     Running   0          1m
notification-controller-xxxxx              1/1     Running   0          1m
3. Create the FluxInstance custom resource that tells Flux how to sync from your Git repository:

File: flux/clusters/dev/flux-instance.yaml

Apply it to your cluster: kubectl apply -f flux/clusters/dev/flux-instance.yaml
4. After applying the FluxInstance, you need to patch the GitRepository to use the GitHub provider:

This tells Flux to use GitHub App authentication instead of SSH.
This is the command:
kubectl patch gitrepository flux-system -n flux-system --type=merge -p '{"spec":{"provider":"github"}}
5. Verify Flux is Syncing

Check that Flux is successfully pulling from your Git repository:

# Check GitRepository sync status
kubectl get gitrepository flux-system -n flux-system

# Should show:
# NAME          URL                                    AGE   READY   STATUS
# flux-system   https://github.com/user/repo           2m    True    stored artifact for revision 'refs/heads/main@sha1:...'

# Check Flux pods are running
kubectl get pods -n flux-system

# Check Kustomizations are applying
kubectl get kustomizations -A
6. Verify Secret Sync from Azure Key Vault

Once Flux reconciles and the Job runs, verify the secret was synced:

# Check the secret sync job completed
kubectl get jobs -n robusta

# Check the secret was created by CSI driver
kubectl get secret robusta-slack-token -n robusta

# Should show labels:
secrets-store.csi.k8s.io/managed: true

# Check job logs
kubectl logs -n robusta -l job-name=keyvault-secret-sync
7. Verify Robusta Deployment

Check that Robusta is running and connected to Slack:

# Check HelmRelease status
kubectl get helmreleases -n robusta

# Should show:
# NAME      AGE   READY   STATUS
# robusta   5m    True    Helm install succeeded...

# Check Robusta pods
kubectl get pods -n robusta

# Should show:
NAME                                 READY   STATUS      RESTARTS   AGE
robusta-forwarder-xxxxx              1/1     Running     0          2m
robusta-runner-xxxxx                 1/1     Running     0          2m
keyvault-secret-sync-xxxxx           0/1     Completed   0          5m

# Check Robusta logs for Slack sink
kubectl logs -n robusta deployment/robusta-runner | grep -i slack
Step 10: Test the Robusta alerting in Slack Channel
Okay so now the next step!, testing if everything we have configured has actually worked.. lets get into it.
What we want to do as a simple sanity test is actually deploy a crashed pod in a particular namespace. We can go and deploy a test pod by doing the following:
- Restart Robusta to pick up config changes:
kubectl rollout restart deployment robusta-runner -n robusta
kubectl rollout restart deployment robusta-forwarder -n robusta
- Wait for rollout
kubectl rollout status deployment robusta-runner -n robusta
-
Test with a CrashLoopBackOff (Not Just Error)
Robusta's built-in playbooks trigger on CrashLoopBackOff status, not a single pod error. Therefore the pod needs to restart multiple times.
This will trigger alerts (keeps crashing)
kubectl run crashloop-test --image=busybox --restart=Always -n default -- /bin/sh -c "exit 1"
-
Now we can check the status of the Pod and see if its in a failing status, we should expect to see it failing due to a crash due to a
CrashLoopBackOfferror like below:And there we have it! Now we can see the Pod failing and if we jump over to the Slack Channel we will see the alerting.
** kubectl get pod crashloop-test -n default **

NAME             READY   STATUS             RESTARTS         AGE
crashloop-test   0/1     CrashLoopBackOff   22 (4m57s ago)   92m
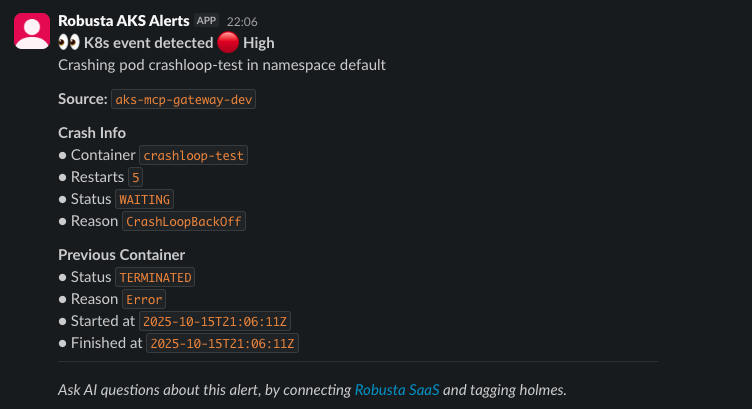
Now we can see the alerting in Slack. if you have followed this guide through to this point you can now see the automation alerting in practice. Robusta is a great open source tool for Kubernetes alerting and transforms basic Prometheus alerts into actionable insights with full Kubernetes context.
You can see this here - Robusta Docs
The next thing we will look to implement in another blog is the Holmes GPT Agent running inside the AKS Cluster, what this will do for us is ensure that after alerting happens we can use the Holmes AI Agent to do some actionable response and troubleshoot the failures and provide fixes such as raising PR's to amend the broken Pods/Images etc. Stay tuned for that!
Step 11: Integrating Holmes GPT
So now the next step for us is to deploy the OpenAI service in Azure for us to get the AI Model of our choosing, this is the current infrastructure setup that we have done for a secure and private connection.
 1. **Azure OpenAI Service** `(terraform/modules/openai/)`

  - **Cognitive Services Account**: cog-openai-dev
  - **Model Deployment**: GPT-4o (version 2024-11-20)
  - **Context Window**: 128K tokens (vs 4K for GPT-3.5-turbo)
  - **Capacity**: 30K TPM (Tokens Per Minute)

    **Security**:
    - Public access disabled
    - Network ACLs deny all public traffic
    - API key stored in Azure Key Vault

2. **Private Endpoint** `(terraform/modules/private-endpoint/)`

  - **Private Endpoint**: pe-openai-dev in AKS subnet
  - **Private DNS Zone**: privatelink.openai.azure.com
  - **Private IP**: 10.0.0.62
  - **Purpose**: Enables AKS pods to access Azure OpenAI without traversing            public internet
  - **DNS Resolution**: Automatic via VNet-linked private DNS zone

3. **AKS Workload Identity**

   - **Federated Identity Credential**: Links Kubernetes service account to             Azure Managed Identity

  - **Service Account**: holmesgpt-holmes-service-account in holmesgpt namespace

  - **RBAC Roles**:
    - Cognitive Services OpenAI User (for Holmes GPT workload)
    - Cognitive Services OpenAI Contributor (for deployer & admin group)

4. **Kubernetes Resources `(Flux CD - flux/apps/holmesgpt/)`

  - **Namespace**: holmesgpt
  - **Helm Chart**: Robustas Holmes chart v0.15.0
  - **Service Account**: Annotated with Workload Identity client ID
  - **ConfigMap**: Azure OpenAI configuration (endpoint, API version, model name)
  - **Secret Provider Class**: CSI driver mounts API key from Key Vault
  - **Pod**: Running GPT-4o model with 128K context window
1. DNS Resolution Test

kubectl run -it --rm debug --image=busybox --restart=Never -- nslookup openai-holmes-dev-5f0cb1.openai.azure.com
Result: ✅ Resolves to private IP 10.0.0.62 via privatelink.openai.azure.com

2. Pod Configuration Verification

kubectl get pod -n holmesgpt holmesgpt-holmes-f6fb47857-wb225 -o jsonpath='{.spec.containers[0].env[?(@.name==AZURE_DEPLOYMENT_NAME)].value}'
Result: ✅ gpt-4o

3. API Functionality Test

kubectl port-forward -n holmesgpt svc/holmesgpt-holmes 8080:80 &

curl -X POST http://localhost:8080/api/chat \
  -H Content-Type: application/json \
  -d '{ask: What pods are running in the default namespace?, model: azure-gpt4o}' | jq .

Result: ✅ Success in ~3 seconds
{
  answer: In the `default` namespace, the following pods are running:\n\n1. `crashloop-test`: Status - `CrashLoopBackOff`, Restarts - 40, Age - 3 hours.\n2. `test-alert-1760554771`: Status - `Error`,
Restarts - 0, Age - 5 hours 4 minutes.
}
**What Holmes Did**:

  1. Received question via API
  2. Called `kubectl_get_by_kind_in_namespace` tool
  3. Retrieved pod data from Kubernetes API
  4. Analysed results with GPT-4o via private endpoint
  5. Returned formatted, human-readable answer

**Summary of what we have done so far:**

We are so close now to having the full implementation setup. So lets take a short summary of what we have done so far:

Robusta has been fully setup and provides us:

  1. **AKS Workload Identity**

  - **Federated Identity Credential**: Links robusta-sa service account to Azure Managed Identity
  - **Service Account**: robusta-sa in robusta namespace
  - **RBAC Roles**: Key Vault Secrets User for secure secret access

  2. **Kubernetes Resources (Flux CD -** **flux/apps/robusta/****)**

  - **Namespace**: robusta
  - **Helm Chart**: Robusta official chart with Prometheus Operator

  - **Secret Provider Class**: CSI driver mounts 4 secrets from Key Vault:
    - robusta-account-key
    - robusta-signing-key
    - slack-app-token
    - slack-bot-token

  - **ConfigMap**: Slack sink configuration routing alerts to #aks-alerts

  3. **Deployment Process**

  - **Connected Slack workspace** → OAuth integration → Bot token generated
  - **Updated Terraform** → Added federated identity for Robusta SA
  - **Created Flux manifests** → Service account, CSI secret provider, Helm release
  - **Deployed via GitOps** → Flux reconciled and deployed Robusta to cluster


 **Holmes GPT is fully operational** and can:

  - Query Kubernetes cluster resources
  - Analyze pod states, logs, and configurations
  - Provide AI-powered troubleshooting recommendations
  - Respond to questions about cluster health and issues


Now if you made it this far, well done as this is a lengthy process. But a highly rewarding one as by the end of it you will have your very own automated monitoring process with an AI response management system. So stay tuned for the finishing touches...
Next we wan to automate the process in slack where:
Robusta sends an alert to the Slack channel ---> User looks at the error ---> tags the bot with @Holmes Bot please investigate this issue and troubleshoot x,y,z ---> the bot will then go and troubleshoot this ---> respond back with its analysis and proposed fixes
So lets get right into it!
Step 12: Integrate the automated Holmes GPT integration in slack
- First we will create the following files:
  **Files Created:**

  - slack-holmes-bot/app.py - Main bot application
  - slack-holmes-bot/requirements.txt - Python dependencies
  - slack-holmes-bot/Dockerfile - Container image definition
What the bot does:
- Listens for @Holmes Bot mentions in Slack using Socket Mode
- Extracts the user's query
- Sends query to Holmes GPT at http://holmesgpt-holmes.holmesgpt.svc.cluster.local:80/api/chat
- Posts Holmes response back to Slack thread
1. Create Slack App (Manual Steps - You will do this yourself, just like we done for Robusta)
- Go to https://api.slack.com/apps
- ** Click Create New App → From scratch **
- **Name: Holmes Bot**
- **Workspace: Select your workspace**
- **Click Create App **
2. **OAuth & Permissions: Add these Bot Token Scopes:**
- **app_mentions: read**
- **chat: write**
- **channels: history**
- **groups: history**
- **im: history
- **mpim: history**
3. **Event Subscriptions**
- **Enable Events: ON**
- **Subscribe to bot events:**
- **app_mention**
- **message.channels**
4. **Socket Mode:**
- **Enable Socket Mode: ON**
- **Name: holmes-bot-socket-token**
- **The scope connections:write is already selected by default**
5. **Install App:**
- **Click - Install to Workspace **
- **Authorize the app**
6. **Get the tokens:**
- **Bot Token: OAuth & Permissions → Bot User OAuth Token (starts with xoxb-)**
- **App Token: Basic Information → App-Level Tokens (starts with xapp-)**
- Once we have these you **must save them into the KeyVault**
- **slack-app-token has xoxb-... (which is a Bot token)**
- **slack-bot-token has xapp-... (which is an App token)**
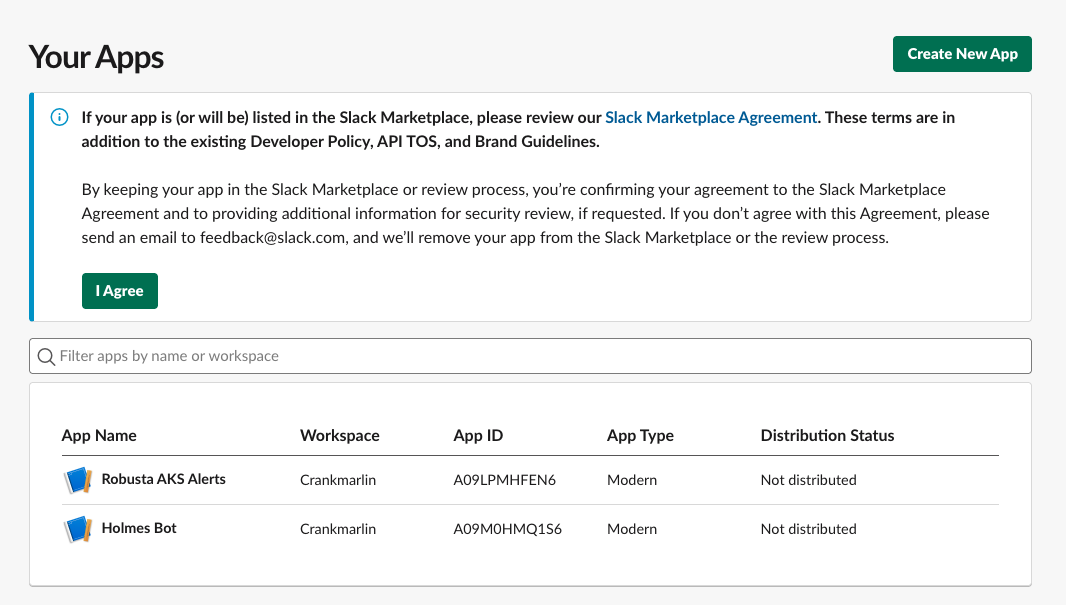
Now you should have two Slack Bots like the below image will showcase:
Then we can add the Holmes Bot and App Token into the Azure KeyVault
# Add the Holmes Bot token

az keyvault secret set --vault-name kv-robusta-dev --name holmes-bot-secret-token --value 'xoxb-...'

# Add the Holmes App Token

az keyvault secret set --vault-name kv-robusta-dev --name holmes-app-token --value 'xapp-...'
Step 13: Create the Flux manifests for the Slack bot deployment
- Now we must create the new directories for the following:
mkdir -p robusta-alerting-automation/flux/apps/slack-holmes-bot
- Now lets go and create the namespace for the slack bot
**flux/apps/slack-holmes-bot/namespace.yaml**
apiVersion: v1
kind: Namespace
metadata:
  name: slack-holmes-bot
- Create the ServiceAccount for the workload identity:
**flux/apps/slack-holmes-bot/serviceaccount.yaml**

apiVersion: v1
kind: ServiceAccount
metadata:
  name: slack-holmes-bot-sa
  namespace: slack-holmes-bot
  annotations:
    # Workload Identity annotation
    azure.workload.identity/client-id: CLIENT-ID # Can be found from TF output
    azure.workload.identity/tenant-id: TENANT-ID # Can be found from TF output
  labels:
    azure.workload.identity/use: true
- Create the SecretProviderClass:
**flux/apps/slack-holmes-bot/secretproviderclass.yaml**

apiVersion: secrets-store.csi.x-k8s.io/v1
kind: SecretProviderClass
metadata:
  name: slack-holmes-bot-keyvault-sync
  namespace: slack-holmes-bot
spec:
  provider: azure

  # Sync secrets to Kubernetes Secret
  secretObjects:
    - secretName: slack-holmes-bot-tokens
      type: Opaque
      data:
        - objectName: holmes-bot-secret-token
          key: slack-bot-token
        - objectName: holmes-app-token
          key: slack-app-token

  parameters:
    usePodIdentity: false
    useVMManagedIdentity: false
    clientID: CLIENT-ID # Can be found from TF output

    # Key Vault details
    keyvaultName: kv-robusta-dev
    tenantId: TENANT-ID

    # Secrets to retrieve from Key Vault
    objects: |
      array:
        - |
          objectName: holmes-bot-secret-token
          objectType: secret
          objectVersion:
        - |
          objectName: holmes-app-token
          objectType: secret
          objectVersion:
- Create the secret sync job:
**flux/apps/slack-holmes-bot/secret-sync-job.yaml**

apiVersion: batch/v1
kind: Job
metadata:
  name: keyvault-secret-sync
  namespace: slack-holmes-bot
spec:
  template:
    metadata:
      labels:
        azure.workload.identity/use: true
    spec:
      serviceAccountName: slack-holmes-bot-sa
      containers:
      - name: secret-sync
        image: busybox:latest
        command: [sh, -c, echo Secrets synced from Key Vault && sleep 10]
        volumeMounts:
        - name: secrets-store
          mountPath: /mnt/secrets-store
          readOnly: true
      volumes:
      - name: secrets-store
        csi:
          driver: secrets-store.csi.k8s.io
          readOnly: true
          volumeAttributes:
            secretProviderClass: slack-holmes-bot-keyvault-sync
      restartPolicy: OnFailure
- Now create the deployment manifest. But first, we need to build and push the Docker image. Let me create a simple deployment that uses a placeholder image for now:
**flux/apps/slack-holmes-bot/deployment.yaml**

apiVersion: apps/v1
kind: Deployment
metadata:
  name: slack-holmes-bot
  namespace: slack-holmes-bot
spec:
  replicas: 1
  selector:
    matchLabels:
      app: slack-holmes-bot
  template:
    metadata:
      labels:
        app: slack-holmes-bot
        azure.workload.identity/use: true
    spec:
      serviceAccountName: slack-holmes-bot-sa
      containers:
      - name: bot
        image: okaneconnor/slack-holmes-bot:latest  # We will build this next
        imagePullPolicy: Always
        env:
        - name: SLACK_BOT_TOKEN
          valueFrom:
            secretKeyRef:
              name: slack-holmes-bot-tokens
              key: slack-bot-token
        - name: SLACK_APP_TOKEN
          valueFrom:
            secretKeyRef:
              name: slack-holmes-bot-tokens
              key: slack-app-token
        - name: HOLMES_API_URL
          value: http://holmesgpt-holmes.holmesgpt.svc.cluster.local:80
        - name: HOLMES_MODEL
          value: azure-gpt4o
        resources:
          requests:
            cpu: 100m
            memory: 128Mi
          limits:
            cpu: 200m
            memory: 256Mi
        volumeMounts:
        - name: secrets-store
          mountPath: /mnt/secrets-store
          readOnly: true
      volumes:
      - name: secrets-store
        csi:
          driver: secrets-store.csi.k8s.io
          readOnly: true
          volumeAttributes:
            secretProviderClass: slack-holmes-bot-keyvault-sync
- Create the kustomization file:
apiVersion: kustomize.config.k8s.io/v1beta1
kind: Kustomization
resources:
  - namespace.yaml
  - serviceaccount.yaml
  - secretproviderclass.yaml
  - secret-sync-job.yaml
  - deployment.yaml
- Now create the Flux Kustomization to deploy it:
**flux/clusters/dev/slack-holmes-bot.yaml**

apiVersion: kustomize.toolkit.fluxcd.io/v1
kind: Kustomization
metadata:
  name: slack-holmes-bot
  namespace: flux-system
spec:
  interval: 10m0s
  path: ./flux/apps/slack-holmes-bot
  prune: true
  sourceRef:
    kind: GitRepository
    name: flux-system
  wait: true
  timeout: 5m
- Now we need to add a federated identity credential for the
slack-holmes-botservice account
# Federated identity credential for Slack Holmes Bot service account
resource azurerm_federated_identity_credential slack_holmes_bot {
  name                = slack-holmes-bot-sa-credential
  resource_group_name = var.resource_group_name
  parent_id           = azurerm_user_assigned_identity.workload.id
  audience            = [api://AzureADTokenExchange]
  issuer              = azurerm_kubernetes_cluster.aks_cluster.oidc_issuer_url
  subject             = system:serviceaccount:slack-holmes-bot:slack-holmes-bot-sa
}
- Now push the Image to the ACR (Only do the ACR image pushing if you are not using the pipeline I havew created. If you have deployed via the pipeline your Docker Image will already be served and taken care of in ACR)
az acr login --name acrrobustadev

docker tag okaneconnor/slack-holmes-bot:latest acrrobustadev.azurecr.io/slack-holmes-bot:latest

docker build --platform linux/amd64 -t acrrobustadev.azurecr.io/slack-holmes-bot:latest .

docker push acrrobustadev.azurecr.io/slack-holmes-bot:latest

The image has been successfully pushed to ACR. Now lets update the deployment manifest to use the ACR image

20 -          image: okaneconnor/slack-holmes-bot:latest  # We will build this next
20 +          image: acrrobustadev.azurecr.io/slack-holmes-bot:latest

kubectl delete pod -n slack-holmes-bot -l app=slack-holmes-bot

## Use this command if Flux has a failed status which may be stale

flux reconcile kustomization slack-holmes-bot --with-source

Now let us verify that Flux picks up the changes and deploys the bot

kubectl get kustomization -n flux-system slack-holmes-bot

kubectl get pods -n slack-holmes-bot)
  ⎿  NAME                                READY   STATUS    RESTARTS   AGE
slack-holmes-bot-6bf5974fbc-t62dq   1/1     Running   0          49s


Then we can check the AKS logs:

kubectl logs -n slack-holmes-bot slack-holmes-bot-6bf5974fbc-t62dq)
     INFO:__main__:Starting Holmes Slack Bot
     INFO:__main__:Holmes API URL: http://holmesgpt-holmes.holmesgpt.svc.cluster.local:80
     INFO:__main__:Holmes Model: azure-gpt4o
Now for the finally.. lets invite the Bot to the slack channel and see if we can get a response.
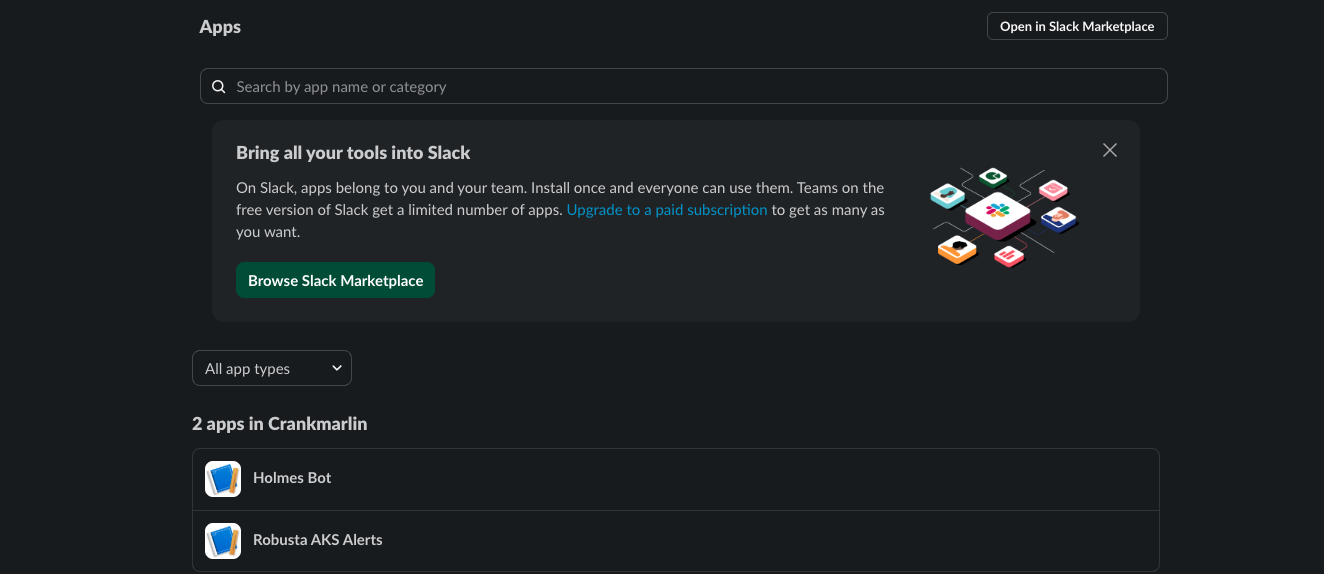
If you go to Slack ---> Add Apps (In the bottom left) ---> Add your Holmes Bot in here
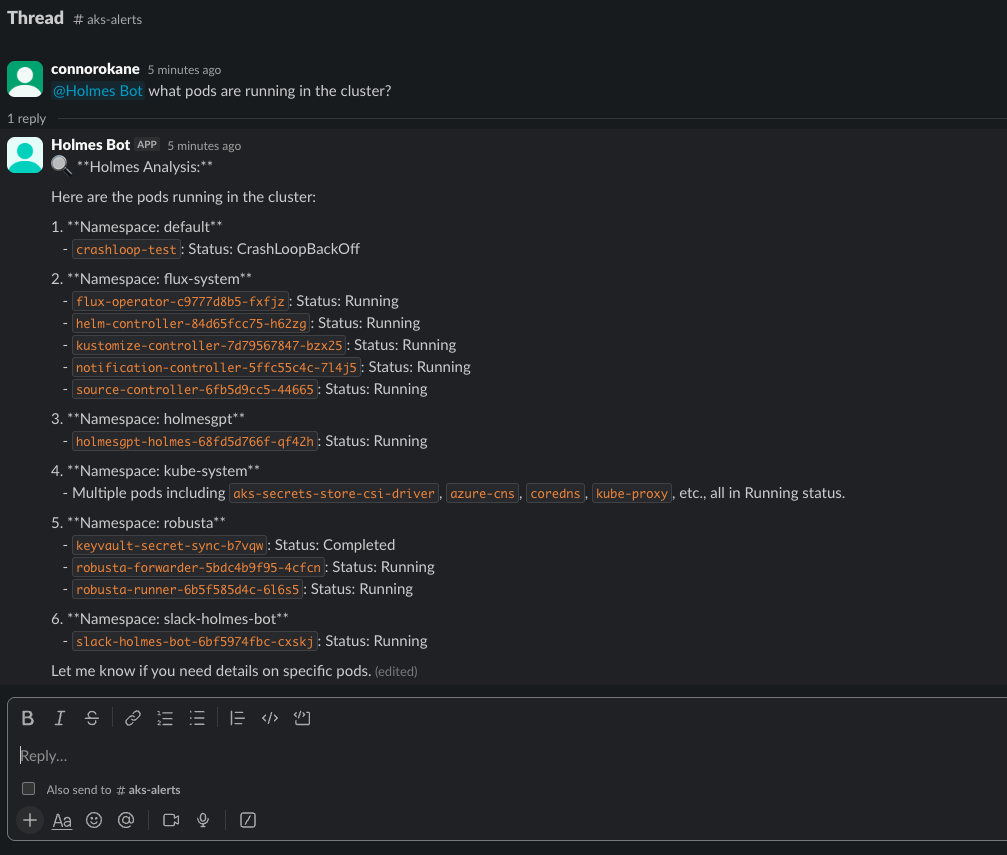
Now we can go into the aks-alerts channel and type something like @holmes what pods are running in the cluster?
And you should see... a response like this!
Conclusion
And there you have it—a complete end-to-end automated solution for your AKS clusters, backed by intelligent incident responses using AI agents like Holmes GPT. We've built a comprehensive monitoring and troubleshooting platform that combines Robusta for real-time Kubernetes alerting, Holmes GPT for AI-powered root cause analysis, and a custom Slack bot for interactive troubleshooting—all deployed using GitOps with Flux CD.
This solution demonstrates how Infrastructure as Code and GitOps principles can be combined with cutting-edge AI technology to transform incident management. By leveraging Terraform for infrastructure provisioning, Azure Workload Identity for secure authentication, and Azure Key Vault for secrets management, we've created a production-ready system that eliminates manual intervention and reduces mean time to resolution.
The power of this architecture lies in its automation. From the moment a pod crashes in your cluster, Robusta detects it, sends an alert to Slack, and Holmes GPT automatically investigates using Azure OpenAI GPT-4o.
Your support/BAU team can then interact with Holmes directly in Slack threads to ask follow-up questions and get AI-driven insights—no deep Kubernetes expertise required. AI is constantly adapting and changing the way we work. Someone with next-to-no AKS knowledge in your BAU/Support teams can now leverage expert-level skills through the help of AI.
What makes this truly powerful is the security model: using federated credentials and workload identity, we've eliminated static secrets from the cluster entirely. Every component authenticates to Azure services using OIDC tokens, with secrets synced from Key Vault via the CSI driver. This follows cloud-native security best practices and ensures your sensitive data remains protected.
I'd also like to give a huge shoutout to Natan Yellin, who is the co-founder of Holmes GPT, for all his help in answering my questions along the way. The work the team is doing to bring AI-powered troubleshooting to the Kubernetes ecosystem is genuinely transformative. Please keep up the great work you and the people at Holmes GPT are doing right now