HashiCorp Vault High Availability Setup with Raft Storage
In this blog post I am going to demonstrate to you how we can enable Raft Replication inside Hashicorp Vault. I'll briefly cover the overall architecture including load balancing and DNS configuration for context.
The purpose of this blog is to show you the step-by-step process of configuring Raft integrated storage for high availability.
I will also explain What is Raft Replication? What is HA? and walk you through the overall architecture of my setup. First let me actually explain what HashiCorp Vault does and its capabilities.
If you would like some tutorials to use as well you can find some here from HashiCorps GitHub page - HashiCorp Vault Raft Examples
What is Vault and how is it used?
HashiCorp Vault is a tool designed to securely manage and store sensitive information, or "secrets," such as API keys, passwords, and certificates. It provides a centralised platform for controlling access to these secrets and includes features like encryption, access control, and audit logging to enhance security
What is Raft Replication and HA?
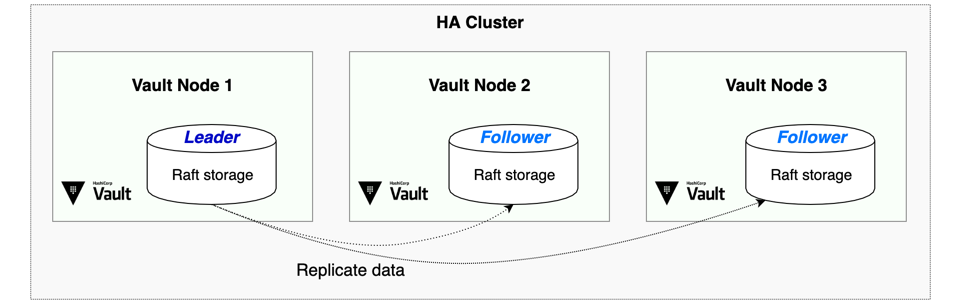
HashiCorp Vault's Raft backend provides high availability (HA) and data replication through the Raft consensus algorithm. This ensures that all nodes in a Vault cluster maintain a synchronised copy of the data, enabling seamless failover and minimising downtime in case of a node failure.
Architecture Overview
Our high availability setup consists of:
- Three Vault VMs running in a dedicated virtual network
- Raft integrated storage for cluster replication
- SSL/TLS encryption for secure communication
- Azure Load Balancer for request distribution
- Private DNS zone for service discovery
- Network Security Groups controlling traffic flow
Networking and Access Configuration
For this setup, I've configured an Azure Load Balancer to distribute traffic across all three Vault nodes. I won't delve too much into this but thought its worth mentioning the overall setup and explain how this is setup for reference.
The load balancer includes:
- A backend pool containing all three Vault VMs
- Health probes monitoring port 8200 to detect healthy instances
- Load balancing rules for ports 8200 (API) and 8201 (cluster communication)
I also created an A record in the private DNS zone pointing to the load balancer's frontend IP. This allows access via https://<YOUR-DNS-NAME>:8200 while the load balancer handles traffic distribution transparently.
This address above is what we will use when exporting the Vault address, things like ADO, Jenkins etc will also use this Vault address to call Vault for accessing secrets as well as the Root Token.
Prerequisites
Before we begin the setup please ensure you have setup the following Infrastructure:
- Three virtual machines in the same subnet.
- HashiCorp Vault installed and running on the VM's.
- Network Security Group rules allowing ports 8200 and 8201 for the Subnet.
- Root CA certificate and private key for SSL certificate generation.
- Admin access to all servers.
Key Concepts
Before diving into the configuration, let's clarify some important concepts:
- Raft Consensus: A distributed consensus algorithm that ensures all nodes in the cluster agree on the current state. It requires a majority (quorum) of nodes to be available for the cluster to remain operational.
- Unsealing: Vault starts in a sealed state where it cannot decrypt data. Unsealing is the process of providing the master key shares to reconstruct the encryption key.
- Quorum: With 3 nodes, at least 2 must be available for the cluster to function (majority rule).
- Port 8200: Used for Vault API communication (client requests)
- Port 8201: Used for internal cluster communication between nodes
Phase 1: SSL Certificate Configuration
Security is a top priority in any infrastructure deployment. We'll start by generating SSL certificates for each node using our existing Root CA and Private Key. This allows Vault to be able to communicate over HTTPS securely.
1. Directory and Permission Setup
Execute these commands on each Vault node to create the necessary directory structure. These are the directories we need to create in order to store the certificates we create.
A quick note to make is that when we copy the CA files from the /tmp directory, in my case I already had these files here as I had recently transferred these from an old > new server so it was easy to use these.
Typically you would find these certs inside a path like pki/pki_root depending on your setup. But its always best practice to have these cleaned up after!
# Create the Raft data directory (If not already created)
sudo mkdir -p /opt/vault/data
sudo chown -R vault:vault /opt/vault/data

# Create TLS directory
sudo mkdir -p /opt/vault/tls

# Set proper ownership and permissions
sudo chown -R vault:vault /opt/vault/tls
sudo chmod 750 /opt/vault/tls

# Copy existing CA files
sudo cp /tmp/root-ca-cert.pem /opt/vault/tls/
sudo cp /tmp/root-ca-key.pem /opt/vault/tls/

# Set CA file permissions
sudo chmod 644 /opt/vault/tls/root-ca-cert.pem
sudo chmod 600 /opt/vault/tls/root-ca-key.pem

# Clean up files after setup
sudo rm -f /tmp/root-ca-*.pem
NOTE: After we are done with this setup please ensure you are not leaving the certificate and key files inside your VM's. Please clean them up once finished.
2. Certificate Signing Request Configuration
Now that we have created the directories we will create a CSR configuration file that defines the certificate properties we want. A CSR is just information about your organisation and websites, which is used to request a digital certificate from a Certificate Authority.
For Node 1:
sudo tee /opt/vault/tls/vault-csr.conf > /dev/null << EOF
[req]
default_bits = 2048
prompt = no
encrypt_key = no
default_md = sha256
distinguished_name = dn
req_extensions = v3_req

[dn]
CN = <REPLACE-WITH-YOUR-CERT-NAME>
O = <YOUR-ORGANISATIONS-NAME>

[v3_req]
basicConstraints = CA:FALSE
keyUsage = nonRepudiation, digitalSignature, keyEncipherment
extendedKeyUsage = serverAuth, clientAuth
subjectAltName = @alt_names

[alt_names]
DNS.1 = <REPLACE-WITH-YOUR-CERT-NAME>
DNS.2 = vault.internal
IP.1 = <PRIVATE-IP-OF-YOUR-VM>
EOF
Note: For Node 2 and Node 3, use the same configuration but change the IP.1 value to your respective IP addresses for the 2nd and 3rd node.
Understanding the CSR fields:
- CN (Common Name): This is the primary identifier of our certificate
- O (Organisation): The company/organisation name (Whatever your company is)
- DNS.1: Primary DNS name users will use to access Vault
- DNS.2: Internal identifier for cluster communication
- IP.1: The private IP address of this specific node
3. Certificate Generation
Now we have our CSR generated, we will create certificates for each of the nodes to allow Vault to communicate over HTTPS. This will allow us to ensure all data in Vault is encrypted during transit and follows HashiCorps best practices. Now we can run these commands below to generate these certificates.
Generate the private key and certificate for each node:
# Generate private key and CSR
sudo openssl genrsa -out /opt/vault/tls/vault.key 2048
sudo openssl req -new -key /opt/vault/tls/vault.key \
    -out /opt/vault/tls/vault.csr \
    -config /opt/vault/tls/vault-csr.conf

# Sign certificate with root CA
sudo openssl x509 -req -in /opt/vault/tls/vault.csr \
    -CA /opt/vault/tls/root-ca-cert.pem \
    -CAkey /opt/vault/tls/root-ca-key.pem \
    -CAcreateserial \
    -out /opt/vault/tls/vault.crt \
    -days 365 \
    -extensions v3_req \
    -extfile /opt/vault/tls/vault-csr.conf

# Set proper permissions
sudo chown vault:vault /opt/vault/tls/vault.key /opt/vault/tls/vault.crt
sudo chmod 600 /opt/vault/tls/vault.key
sudo chmod 644 /opt/vault/tls/vault.crt
4. Certificate Verification
To confirm our certificates have been generated with the proper configuration we require, lets run this command here below to do this
Verify that each certificate contains the correct information:
openssl x509 -in /opt/vault/tls/vault.crt -text -noout | grep -A1 "Subject Alternative Name"
The output should display your DNS names and each VM's IP address respectively when ran for each certificate, this will help us confirm the certificate is correctly configured.
A good note to make is to think ahead, have you got a measure in place to regenerate these certificates once they expire 365 days down the line? These TTL's will be as short as 47 days in the near future so just one to consider!
Phase 2: Raft Storage Configuration
With SSL certificates in place, we'll configure Vault to use Raft integrated storage for high availability clustering.
Vault Configuration File
Create or update the vault.hcl configuration file on each node. Here's an example configuration:
ui = true

storage "raft" {
  path    = "/opt/vault/data"
  node_id = "node1"  # Change to node2, node3 for other nodes

  retry_join {
    leader_api_addr = "https://<PRIVATE-IP-OF-NODE-2>:8200"
  }

  retry_join {
    leader_api_addr = "https://<PRIVATE-IP-OF-NODE-3>:8200"
  }
}

listener "tcp" {
  address            = "0.0.0.0:8200" # Binds to all interfaces
  cluster_address    = "0.0.0.0:8201" # Cluster communication from any interface
  tls_cert_file      = "/opt/vault/tls/vault.crt"
  tls_key_file       = "/opt/vault/tls/vault.key"
  tls_client_ca_file = "/opt/vault/tls/root-ca-cert.pem"
}

api_addr = "https://<PRIVATE-IP-OF-NODE-1>:8200"      # Update IP for each node
cluster_addr = "https://<PRIVATE-IP-OF-NODE-1>:8201"  # Update IP for each node
Important: Adjust the IP addresses and Node IDs for each respective node in your cluster.
Configuration Note: Each node's retry_join block should only include the OTHER nodes in the cluster, not itself. For example:
- Node 1: includes Node 2 and Node 3
- Node 2: includes Node 1 and Node 3
- Node 3: includes Node 1 and Node 2
Now that we have updated the configuration file we can run the following commands below to restart Vault and ensure these changes are fine.
# Restart the Vault service on each node after config updates
systemctl restart vault

# Check the vault status
systemctl status vault
Phase 3: Cluster Initialisation
Initialise the Leader Node
Now we have gotten our Vault config setup and communicating using HTTPS. We can begin to initialise the first Vault node, which will serve as the cluster leader:
vault operator init
Critical: Store the output securely. You'll receive:
- 5 unseal keys
- 1 root token
I recommend storing these in Azure Key Vault or another secure secrets management system.
Unseal the Leader Node
Unseal the leader node using three of the five generated keys:
vault operator unseal  # Enter Key 1
vault operator unseal  # Enter Key 2
vault operator unseal  # Enter Key 3
NOTE: Always use the same three keys in the same order for consistency across unsealing operations.
Verify the node status:
vault status
You should see:
Sealed: falseInitialized: true
Join Remaining Nodes to the Cluster
On Node 2 and Node 3, unseal Vault using the same three keys from the leader node:
We MUST use these same unseal keys for node 2 and 3 as we generated in the 1st node, we MUST NOT reinitialise the Vault node's for 2 and 3.
We can run these commands below on nodes 2 and 3, we will use the same unseal keys we used previously for this.
vault operator unseal  # Enter the same Key 1
vault operator unseal  # Enter the same Key 2
vault operator unseal  # Enter the same Key 3
Verify Cluster Status
From any node, verify that Raft peering has been established successfully:
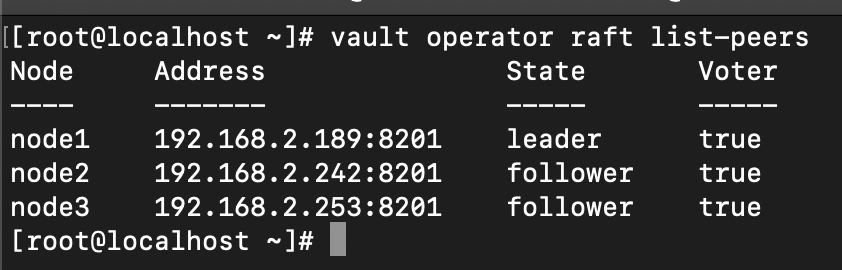
Now we should be able to see the 3 nodes with their elected states.
vault operator raft list-peers
This command should display all three nodes in the cluster, confirming successful replication setup.
You can see something like this below to confirm that we have successfully configured this properly!
After initial setup:
- Store the root token securely.
- Never store unseal keys on the Vault servers themselves.
- Consider implementing auto-unseal with Azure Key Vault.
Environment Configuration
Set up environment variables for secure access:
export VAULT_ADDR="https://<YOUR-DNS-NAME>:8200"
export VAULT_CACERT="/opt/vault/tls/root-ca-cert.pem"
export VAULT_TOKEN="VAULT-ROOT-TOKEN"
Functionality Testing
Test basic Vault operations:
# Check cluster status
vault status

# List cluster peers
vault operator raft list-peers

# Test secret creation, should be able to get read on all 3 Nodes
vault kv put secret/test key=value
vault kv get secret/test
Key Benefits of This Setup
High Availability: Raft consensus ensures your secrets remain available even if one node fails.
Security: End-to-end SSL encryption protects data in transit, whilst proper certificate management ensures trust.
Scalability: The load balancer distributes requests efficiently across all healthy nodes.
Operational Excellence: Auto-unsealing capabilities (when configured with Azure Key Vault) reduce manual intervention during restarts.
Common Issues and Solutions
Certificate Errors: Verify that all certificates contain the correct Subject Alternative Names and are signed by the same CA.
Cluster Communication Problems: Ensure Network Security Group rules allow traffic on ports 8200 and 8201 between all cluster members.
Unsealing Issues: Always use the same three unseal keys in the same order across all operations.
Load Balancer Health Checks: Verify that health probes are correctly configured to monitor Vault's API endpoint.
Next Steps
With your Vault cluster now operational, consider implementing the following best practices below, I will cover the likes of Auto Unsealing, Azure OIDC Auth in future blog posts
- Auto-unseal with Azure Key Vault: Eliminate manual unsealing
- Backup procedures: Regular snapshots using
vault operator raft snapshot save - Monitoring: Set up alerts for cluster health and certificate expiration
- Auth methods: Configure Azure AD/OIDC instead of using root tokens
- Certificate Renewal: Setting up automated approaches for certificate renewals.
Conclusion
This high availability Vault setup provides a robust foundation for secrets management in enterprise environments. The combination of Raft storage, SSL encryption, and load balancing ensures both security and reliability.
The configuration described here has been tested in production environments and provides excellent performance characteristics whilst maintaining the security standards required for sensitive data management.
For enhanced security, consider implementing auto-unsealing with Azure Key Vault and configuring OIDC authentication with Azure Active Directory to eliminate the need for shared root tokens in day-to-day operations.