Exporting Private Key and Root CA from old Hashicorp Vault cluster to a new one.
📝 Introduction: The Challenge We Faced
Today I'll be demonstrating to you how you can migrate your existing Private Key and Root CA from an old Hashicorp Vault cluster to a new one in a secure and safe way. Below I'll explain some of the challenges we faced and the reason we had to carry this piece of work out.
Our organisation relied heavily on HashiCorp Vault to manage secrets and provide PKI (Public Key Infrastructure) services across our development and production environments. However, we found ourselves in an increasingly precarious position - our Vault deployment was running version 0.8.1, released in 2017 and several major versions behind the current release.
Lastly, we have installed HashiCorp Vault on 3 VM's. This was for setting up Raft Replication which I will cover in a later blog post.
This outdated version posed significant risks:
-
Security vulnerabilities that had been patched in newer versions
-
Missing critical features required for our evolving infrastructure
-
Limited support options as HashiCorp focused on newer releases
-
Compliance concerns as security audits flagged the outdated software
Our Migration Approach: Clone, Test, Migrate
Rather than risking our existing environment which was live, we developed a three-phase strategy which included taking backups of the existing VM's that Vault ran on, and restoring these onto separate VM's for the migration. Below is the approach we took:
- Clone the existing environment to create a safe testing ground
- Incrementally upgrade the cloned Vault instance
- Extract the Root CA/Private Key into files we migrated over to the new VM's
- Import the Root CA/Private key into the new VM's running Vault
- Validate the migration before switching production traffic
This approach allowed us to experiment freely without endangering our production infrastructure.
Step 1: Creating a Safe Testing Environment
Before touching any production systems, we created a clone of our existing Vault deployment:
- We cloned the virtual machines hosting our old Vault server
- We ensured the cloned environment was isolated from production to prevent any accidental impact. Ensuring the servers resided in their own VNET.
- We validated the clone was functioning correctly before proceeding with any changes by listing secrets etc
This approach gave us a safe environment to test our migration strategy without risking our production PKI infrastructure.
Step 2: Upgrading cloned Vault servers Incrementally
The original Vault server was running version 0.8.1, which didn't provide the API endpoints necessary to access the private key. We needed to upgrade to version 1.14.0+ to gain access to the raw storage API.
Rather than attempting a massive version jump, we took an incremental approach:
- First, we upgraded from v0.8.1 to v1.3.10
- After testing that this version worked properly, we upgraded to v1.14.0 and then finally v1.17.0
For each upgrade, we ran the following commands on the cloned VM:
Download the specific Vault version: wget https://releases.hashicorp.com/vault/1.14.0/vault_1.14.0_linux_amd64.zip
Unzip the downloaded file: unzip vault_1.14.0_linux_amd64.zip
Replace the old Vault binary: mv vault /usr/bin/vault
Restart the Vault service: systemctl restart vault
Verified the new version: vault version
It's worth noting that we didn't need to upgrade Consul (which was running v1.0.6) for this part of the migration. The only version we needed to upgrade was Vault.
Troubleshooting Tip: If Vault fails to start after upgrading, check the logs with journalctl -u vault. Common issues include permission problems or incompatible configurations.
Step 3: Enabling the Raw Storage API
After upgrading to Vault 1.17.0, we needed to modify the Vault configuration file to access the raw storage API endpoint, which would allow us to extract the private key. This was a critical step, as the regular Vault API doesn't expose private keys.
So what is the sys/raw endpoint, and why do we need it in order to fetch our Private Key?
This end point provides us access to the raw storage underlying the Vault's key value store. This endpoint is what allows us to bypass the standard Vault API and interact directly to the underlying storage backend where the keys are kept.
By default this endpoint is disabled and requires a specific configuration change which I am going to show you how to do below. But its worth giving you some background on how this works and why we are actually doing it for context.
Security Warning: Enabling the raw storage endpoint should be done with extreme caution and only for specific operations like our migration. It should be disabled immediately afterward.
So now you know the reason behind why we done this, I am going to walk you through as to how you can enable it using the Vault configuration file.
As you will see below, we have added a line in the Vault config file, which can be done modifying the following file > /etc/vault/vaultconfig.hcl and then adding this line below inside it
raw_storage_endpoint = true
The raw_storage_endpoint setting enables access to Vault's underlying storage system.
Here's what our full configuration file looked like afterwards:
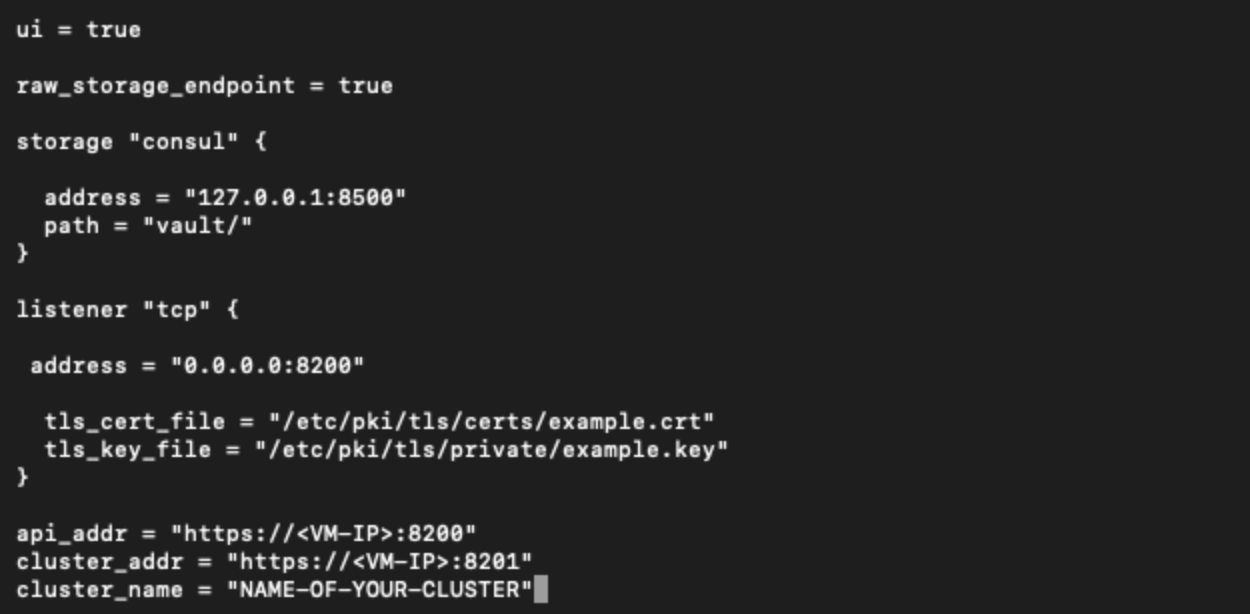
After making these changes, we restarted Vault to apply these changes.
systemctl restart vault
So now we have successfully enabled the endpoint and next we will walk through how to actually fetch the key for the Private Key from Vault.
NOTE: If Vault fails to start due to mlock errors, adding disable_mlock = true resolves the issue. This setting disables the use of mlock to lock Vault’s data in memory, which can be problematic on virtualiSed systems.
Step 4: Exploring the PKI Backend for the Private Key
With the raw storage now enabled, we can now locate our Private Key. This required us to understand the storage structure Vault uses for its PKI engine.
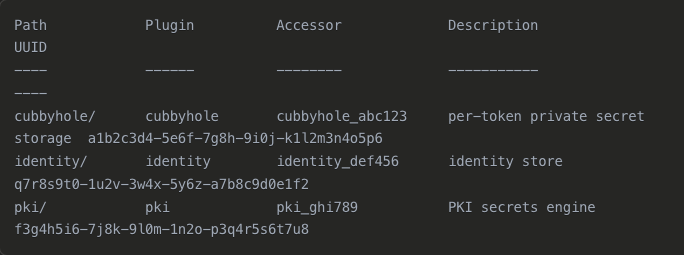
First, we needed to find the UUID that Vault assigned to our PKI secrets engine. This is crucial because Vault uses this UUID in the storage path rather than the human-readable name ("pki"):
vault secrets list -detailed
This command will list your secrets engines and a UUID number
So now we have the UUID for the mount path, we can run another command which will list an output like below. This is the command we will run:
vault list sys/raw/logical/<MOUNT-PATH-UUID>/config
Once we run this command we get the below output
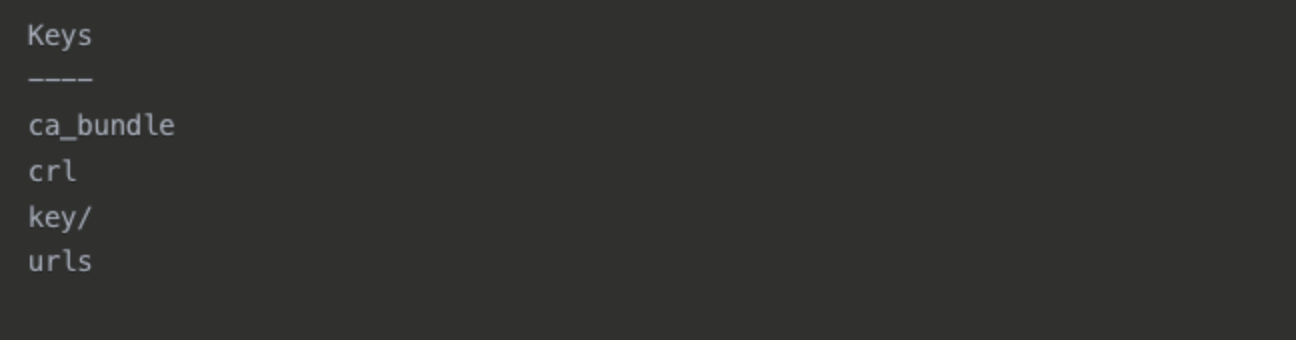
Next, we needed to find the specific key UUID in the backend. This command below returns a list of UUIDs, each representing a different key:
vault list sys/raw/logical/<MOUNT-PATH-UUID>/config/key
Now we can see the keys UUID in the below output:

So now we have gathered two things:
- The mount path UUID of where the key is stored at.
- The UUID of the specific key.
Our final step is to now read the Private Key which we can do using this command below:
vault read sys/raw/logical/<MOUNT-PATH-UUID>/config/key/<KEY-UUID>
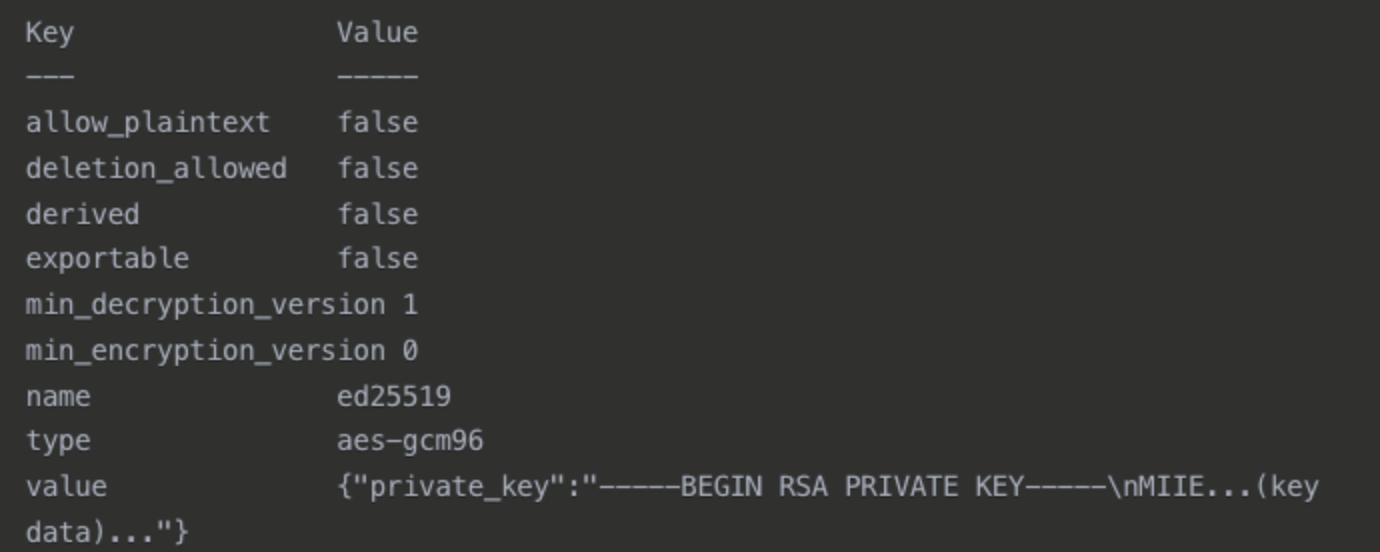
So now we can see our private key from the output above, we will now store the Private Key in a file which we will later use to compare it to the Root CA and ensure the modulus matches.
You can run this next command to save it into a file below:
vault read -field=value sys/raw/logical/<MOUNT-PATH-UUID>/config/key/<PRIVATE-KEY-UUID> | jq -r .private_key > root-ca-key.pem
This command uses jq to extract just the private_key field from the JSON response and saves it to a file named root-ca-key.pem
Note: If you're not familiar with jq, it's a command-line JSON processor.
Now we have successfully located and saved the Private Key into a file. Our next step will be locating and saving the Root CA and then comparing their modulus to ensure they belong together.
Step 6: Extracting the Root CA
Next we will extract the Root CA, to do this we will pull the cert from the mount path in Vault where its stored, and save it to a file to later inspect. Similar to what we have previously done for the Private Key.
First of all lets run a command which will disply all of our available mount paths we have inside Vault, as you can see below there is a pki/ path. This is where our Root CA lives:
This command below allows to us to view all mount paths:
vault secrets list

NOTE: This may be different depending on where you store your Root CA. If you store it somewhere else like pki_root etc then you will use this path to read the certificate.
Now we can run the next command which is going to write the certificate content to a file:
vault read -field=certificate pki/cert/ca > root-ca-cert.pem
Now we have stored the Root CA in a file called root-ca-cert.pem and we are ready to compare the modulus and ensure that the key/cert belongs together.
NOTE: If you want to create a bundle with the cert and key combined then you can run the below command:
cat root-ca-cert.pem root-ca-key.pem > root-ca-bundle.pem
Step 7: Verifying the Private Key and comparing the Modulus
Next we are going to compare the Cert and Keys modulus and ensure they are the same, this is a common test ran to ensure that they match and we haven't gotten the wrong pair.
Comparing the modulus of a certificate and private key verifies they form a cryptographic pair - both containing the same large prime number product (modulus) that's unique to that key pair, confirming they belong together and were mathematically derived from the same source.
NOTE: A good point to note is when you check this, the outputs for the key and cert should be the same. If the commands outputs two different strings, then we know this key and cert do not belong to each other.
Below are the commands that we will use to investigate the modulus:
openssl rsa -in root-ca-key.pem -modulus -noout
openssl x509 -in root-ca-cert.pem -modulus -noout
After running these commands, if you see the same output for both commands you have successfully retrieved and exported the Root CA and Private Key!
Step 8: Setting Up Secure Communication Between Servers
Since our old and new Vault servers were in different virtual networks, we needed to establish connectivity between them.
Our main objective here is ensuring we have a seamless connection from the cloned VM we used as a sandbox to our new VM's we want to export them too
- We configured VNET peering between the source and target virtual networks in Azure
- We verified connectivity by testing ping between the servers
Once we are happy that the connection between the two VNET's are now good. We are ready to transfer over the files to our new environment.
Step 9: Securely Transferring the Files
To securely transfer the certificate and key files between servers, we used SSH key-based authentication. Below isn the steps taken in order to ensure a smooth secure transfer:
Generate an SSH key pair on the old server
ssh-keygen -t rsa -b 4096
Copy the public key to the new server
ssh-copy-id vm-username@<new-vault-server-ip
Transfer the files securely using SCP
scp /tmp/root-ca-key.pem /tmp/root-ca-cert.pem /tmp/root-ca-bundle.pem <VM-USERNAME>@<NEW-SERVERS-IP>:/tmp/
Using SSH keys and SCP ensured our sensitive PKI materials were encrypted during transfer. We also copied the public key to the new Vault servers authorised_keys file in the .ssh directory.
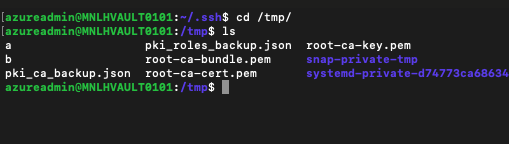
Once we have run these commands we can confirm that the SCP transfer of the Root CA, Private Key and CA Bundle have worked by logging into the new server and confirming we can find them inside the /tmp directory
NOTE: Please ensure that these are removed after use as you do not want such sensitive files in your server where they are not required!
Step 10: Importing the Root CA into the new Vault server
With our files safely transferred to the new server, we now need to properly configure the PKI secrets engine and import our Root CA. This is a three-part process:
- Enable the PKI engine: This creates a mount point at
/pkiwhere our certificates and keys will be stored. By default, Vault sets a maximum lease TTL of 32 days for the PKI engine, but you can customize this based on your certificate needs:
vault secrets enable pki/
- Configure URLs for the PKI engine: These URLs are embedded in issued certificates to inform clients of the following:
- Where to download the CA certificate for chain verification (
issuing_certificates) - Where to check if a certificate has been revoked (
crl_distribution_points)
vault write pki/config/urls \
  issuing_certificates="https://<HOST-NAME>:8200/v1/pki/ca" \
  crl_distribution_points="https://<HOST-NAME>:8200/v1/pki/crl"
- Import the Root CA certificate and private key: Finally, we import the Root CA certificate and its private key using the bundle file we created earlier:
vault write pki/config/ca pem_bundle=@/tmp/root-ca-bundle.pem
This command tells Vault to:
- Import the certificate in the bundle as the CA certificate for this PKI engine
- Import the private key to enable signing operations
- Set up the necessary infrastructure to issue new certificates
Now we are good to go, we have done the following:
- Enabled our secret engine: This is where we will store our Root CA
- Configure URL's These URL's will be used for the PKI engine
- Imported the Root CA/Private Key: Now when we want to generate new certificates, we will use our imported Root CA and sign the certs with the Private Key.
Our final step will be a validation to ensure when we generate certificates for services to use that we know its been signed from our cert and key.
Security Note: After successful import, remember to securely delete the key files from the /tmp directory as they are no longer needed:
Step 11: Validating the Migration
Finally, we validated the migration by issuing a test certificate:
- Issue a test certificate: We issued this certificate as a test and check the issuer to be sure it was signed by the Root CA we imported*
vault write pki/issue/ca-test-dot-com \ common_name="test.ca-test.com" \ ttl="72h"
- Examine the certificate: We then examined the test certificate to verify it was signed by our imported Root CA:
openssl x509 -in test_cert.pem -text -noout
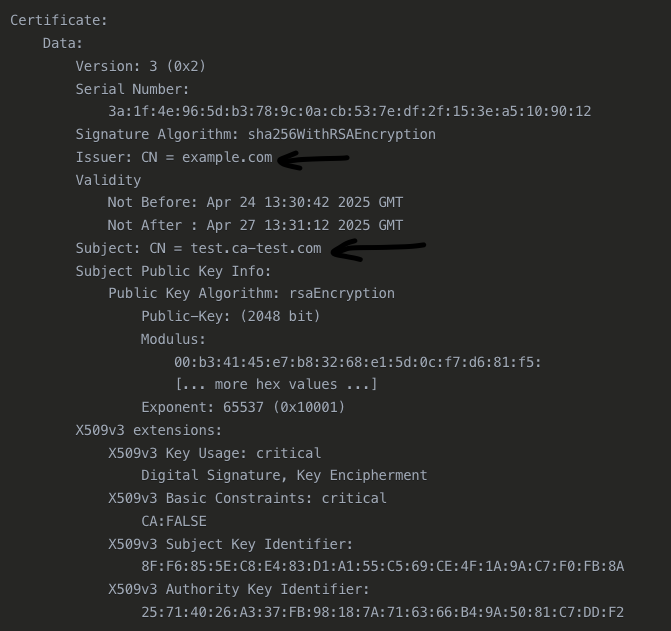
So what have we just confirmed?
In this output, the most important part for your verification is the Issuer line:
Issuer: CN = example.com
This shows that the certificate was signed by the Root CA with the Common Name "example.com". For a test we just named it this as a proof of concept. Whatever your Root CA name may be the same thing will apply. Once you generate a certificate, the issuer of the certificate must match the name of your Root CA.
And that's the migration finished.
If you have followed this guide you will now have successfully learned how you can migrate an existing Root CA/Private Key from one Vault service to another. Finally we'll conclude what we achieved and the key takeaways.
Just to note, this was a use case in which we had to preserve our original Root CA and Private Key as there was a demand from stakeholders to remain with the existing ones, and not replacing them.
Lessons Learned and Best Practices
This migration taught us several valuable lessons that we'll apply to future infrastructure projects:
-
Clone before migrating: Creating a safe testing environment proved invaluable. During our first attempt, we discovered that direct access to the raw storage required configuration changes that would have been risky to implement directly in production.
-
Understand the internal storage structure: Vault's raw storage API is powerful but requires deep understanding of Vault's data organization. We spent several days studying the storage structure before attempting the migration, which saved us from potentially corrupting critical data.
-
Incremental upgrades are safer: Our first attempt to jump directly from v0.8.1 to v1.14.0 failed with cryptic errors. The step-by-step upgrade approach (0.8.1 → 1.3.10 → 1.14.0 → 1.17.0) avoided compatibility issues and allowed us to test functionality at each stage.
-
Verify cryptographic material thoroughly: The modulus check was crucial - our first extracted key actually didn't match our Root CA certificate! This verification step prevented us from importing mismatched cryptographic material.
-
Maintain multiple verification steps: Each phase had validation checks that caught issues early. When importing the CA into the new server, our certificate issuance test revealed a misconfiguration in the PKI engine URLs that would have caused certificate validation failures.
-
Document everything: We created detailed logs of all UUIDs, paths, and commands used. When we needed to restart the process due to a system update occurring mid-migration, this documentation allowed us to quickly resume where we left off.
Challenges We Overcame
The migration presented several significant challenges that required creative problem-solving:
-
Limited documentation: HashiCorp intentionally doesn't document the process of exporting private keys from Vault as it's generally considered a security anti-pattern. We had to piece together information from community forums, GitHub issues, and get creative with ways we could think of how this would be made possible.
-
Networking complexity: Our new Vault infrastructure was in a different VNET. Establishing secure connections between the different Azure VNETs required coordination with three separate teams and custom network security rules to allow the minimal required access while maintaining our security posture.
Conclusion: A Successful Foundation for Future Improvements
The successful migration of our Root CA to a modern Vault infrastructure provided immediate benefits:
- Improved security through access to the latest security patches
- Enhanced feature set including new authentication methods and secret engines
- Better performance with the more efficient storage backend
- Simplified management with improved UI and API capabilities
Most importantly, we accomplished this without disrupting the certificate chain of trust that our applications relied on. The migration provided a solid foundation for future PKI improvements while maintaining continuity with our existing certificate ecosystem.
By taking a methodical, security-focused approach with proper planning and testing, we successfully navigated a complex migration that could have otherwise resulted in significant service disruptions.