Disk Partitioning Blog
Introduction
Recently, I had a challenge of downsizing the managed disks attached to the VM for cost savings, in doing this we had to create a new managed disk with the Standard HDD disk type and then partition the disk and create a mount point for the disk. In this blog post, we'll explore the process of how we can partition the disk in Linux. Disk partitioning allows us to divide a hard disk into multiple logical storage units, providing better organization and management of your disk space. Below we'll go through the steps to create a partition, format it with the ext4 filesystem, and mount it for use.
Prerequisites
Before you begin, ensure you have the following:
- An Azure subscription
- Terraform installed on your local machine
- Azure CLI installed on your local machine
- Basic knowledge of Terraform and Azure
- The Terraform configuration files for this tutorial, which can be found in the GitHub repository
Infrastructure Setup for Disk Partitioning on Azure Virtual Machine
When setting up the infrastructure for partitioning a disk on an Azure virtual machine, there are a few key components involved. First, you need to create an Azure resource group, which acts as a logical container for all the resources related to your virtual machine. Within the resource group, you'll provision a virtual network and a subnet to define the network environment for your virtual machine.
Next, you'll create an Azure virtual machine within the subnet. This virtual machine will have an operating system disk and any necessary configuration, such as the VM size and authentication settings. To enable disk partitioning, you'll also need to create an Azure managed disk and attach it to the virtual machine. The managed disk is a separate storage resource that provides persistent and scalable storage for your data.
To connect to the virtual machine and perform the disk partitioning steps, you'll need to set up network connectivity and secure access. This involves creating a public IP address and configuring a network security group (NSG) to allow inbound SSH traffic to the virtual machine. The NSG acts as a virtual firewall, controlling access to the virtual machine based on predefined security rules.
By provisioning these infrastructure components - the resource group, virtual network, subnet, virtual machine, managed disk, public IP, and network security group - you establish the necessary foundation for partitioning and managing disks on your Azure virtual machine. This infrastructure setup ensures that your virtual machine has the required resources, connectivity, and security in place to support your disk partitioning tasks.
Generating SSH Key Pair
Before connecting to your Azure virtual machine, you need to generate an SSH key pair. The SSH key pair consists of a public key and a private key. The public key is uploaded to your Azure VM, while the private key is kept securely on your local machine. To generate an SSH key pair, follow these steps:
-
Open a terminal or command prompt on your local machine.
-
Run the following command to generate an SSH key pair:
ssh-keygen -t rsa -b 4096 -C "[[email protected]](mailto:[email protected])"
Replace "[[email protected]](mailto:[email protected])" with your email address or any other comment to identify the key.
-
Enter a passphrase for additional security.
-
The SSH key pair will be generated. The public key is saved as
id_rsa.pub, and the private key is saved asid_rsa(assuming you used the default location).
Make sure to keep your private key secure and do not share it with anyone. You will need the path to the private key file when connecting to your Azure VM.
Connecting to the Virtual Machine
Before starting the partitioning process, you need to connect to your Azure virtual machine. You can use SSH (Secure Shell) to securely connect to the VM. Make sure you have the public IP address of your virtual machine and the corresponding private key. Open a terminal or command prompt and run the following command:
ssh -i <private_key_file> <username>@<public_ip_address>
Replace <private_key_file> with the path to your private key file, <username> with the username for your VM, and <public_ip_address> with the public IP address of your virtual machine. Once connected, you can proceed with the disk partitioning steps.
Start the partitioning process
- Run the following command to start the partitioning process for the desired disk (replace /dev/sdc with the actual disk name):
sudo parted /dev/sdc
- You will enter the parted interactive shell.

Create a partition table
- In the parted shell, create a new partition table by running the following command:
(parted) mklabel gpt
-
This will create a GPT (GUID Partition Table) partition table on the disk.
Create a partition
- Still in the parted shell, create a new partition by running the following command:
(parted) mkpart primary ext4 0% 100%
-
This command creates a primary partition spanning the entire disk (from 0% to 100%) and sets the filesystem type to ext4.

Exit the parted shell
- To exit the parted shell, type:
(parted) quit
Format the partition
- Run the following command to format the newly created partition with the ext4 filesystem (replace /dev/sdc1 with the actual partition name):
sudo mkfs.ext4 /dev/sdc1
Create a mount point
- Choose a directory where you want to mount the partition. For example, let's create a mount point called /mnt/data:
sudo mkdir /mnt/data
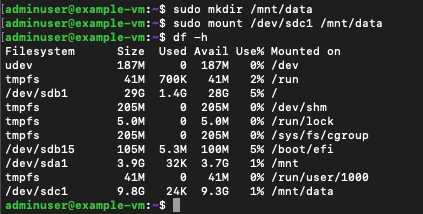
Mount the partition
- Run the following command to mount the partition to the mount point:
sudo mount /dev/sdc1 /mnt/data
-
The partition is now mounted and accessible at /mnt/data.
Configure automatic mounting (optional)
-
To automatically mount the partition on system boot, you need to modify the /etc/fstab file.
-
Open the /etc/fstab file with a text editor:
sudo nano /etc/fstab
- Add the following line to the file (replace /dev/sdc1 with the actual partition name):
/dev/sdc1 /mnt/data ext4 defaults 0 0
-
Save the file and exit the text editor.
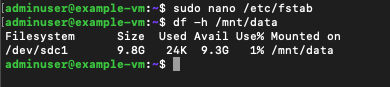
Verify the mount point
- To verify that the partition is mounted correctly, run the following command:
df -h /mnt/data
- It should display the disk space usage and mount point information as can be seen on the screenshot above. Congratulations! You have now just partitioned your disk. We partition a Disk for specific tasks, like swapping, caching or to boost a systems performance. For those wanting to run multiple operating systems on a single machine, separate partitions are essential. Each operating system typically requires its own dedicated partition.